
- Blog Post
- Estimated Read Time 0:05:29
- Getting Started
How to Create and Use a Stakeholder Page
Stakeholder pages are useful tools that can be used to keep other people up to date about what exactly is happening with legislation and regulations that concerns you or your organization. Stakeholder pages can be shared privately with a small group of people, or they can be shared with the public at large. This guide will give you a quick overview of how you can make your very own Stakeholder Page, as well as some tips for how you might want to use it.
The stakeholder page is a customizable, interactive grid that you can publish on your website or share via link. You choose which bill or regulation information to share, including your own comments and calls to action.
If shared publicly, visitors can sort, filter, and read bills via the bill detail link to get more information without needing their own BillTrack50 account. To see regulations, they will need to have a BillTrack50 free or paid account. They can also interact with any custom information you have chosen to include in the grid.
When shared within BillTrack50, the stakeholder pages include an optional discussion forum where your users can leave comments and other information, like a tiny legislative slack. This forum can be a great tool to solicit opinions and feedback from stakeholders and subject matter experts and organize relevant information all in one place.
You can also view this material in this video.
IMPORTANT NOTE: Stakeholder pages are based on an underlying bill or regulation sheet, if you do not have a sheet set up then you’ll need to create one before you start the process of creating a stakeholder page.
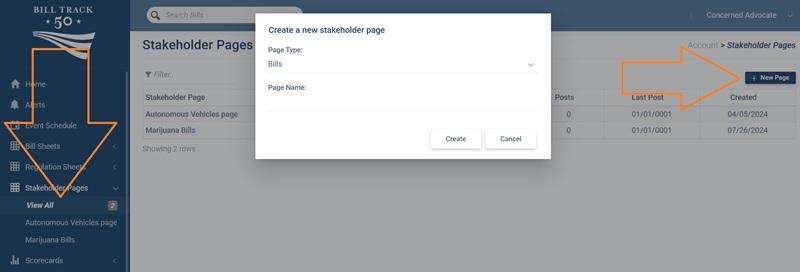
Step 1. Create your page. The first step to making a Stakeholder page is to click on “Stakeholder Pages”, then “View All” in the navigation panel on the left side of your screen. Once on the Stakeholder Pages screen you click on “New Sheet” in the top right corner. The image below shows you exactly where both of these buttons are.
If you just want to edit an existing page then simply click on that page from the list, then skip to step 3.
Step 2. Configure required items. Once you have clicked on the “New Sheet” button a pop-up will appear. For the first item choose whether you want create a stakeholder page based on a bill sheet or one based on a regulation sheet. For the second item enter a name for your new Stakeholder Page (you can change the name anytime later). Then click the “Create” button.

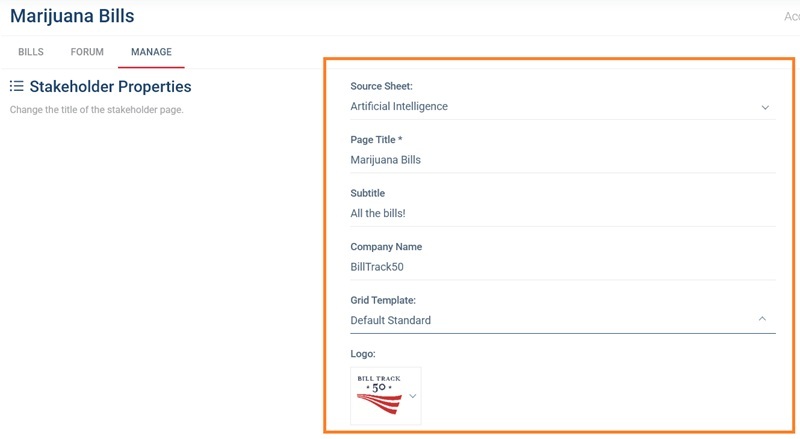
Step 3. Configure optional items. After clicking create you will be taken to the Manage tab of your new Stakeholder Page to make any adjustments you might need. You also have access to two other tabs: the “Forum” tab, which is a basic discussion forum (more info in Step 5 below) and the “Stakeholder Page” tab where you can view the bills (more info in Step 6 below).
The settings on the manage tab are as follows;
- Source Bill Sheet: The source bill sheet is the sheet containing the bills or regulations you will be sharing with people on the “Stakeholder Page” tab - select it from the drop down menu.
- Page Title: The title you entered in Step 2 which appears at the top of the screen, in this example it is called “Marijuana Bills”. You can edit the name any time.
- Subtitle: Subtitles are optional, but give you more space to explain what your Page is all about. Whatever your type as the Subtitle will show up below the page title, in this example the subtitle is “All the bills!”.
- Company Name: This is where you can put your organization’s name to let people know who made the Stakeholder page in case they have access to Pages from several different organizations.
- Grid Template: The Grid Template setting allows you to decide which columns the Stakeholder Page will display. This allows you to display different columns on your Stakeholder Page than on your bill sheet, allowing you to keep private notes private. Please note, that you need to have the correct account permission settings to use templates. See the template section of this post for more information on templates.
- Logo: The logo option lets you choose and image to go with your bill sheet, use this to further let people know who made the Bill Sheet. See this video to learn how to load a logo into your account.
Step 4. Configure forum and sharing options. The lower part of the “Manage” tab offers several more options for how you’d like to share your sheet.
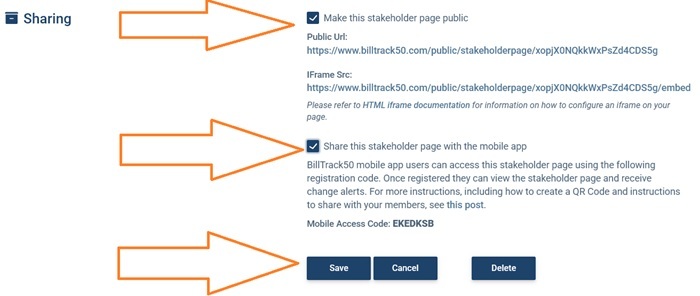
- Make this Stakeholder Page Public: Checking this box will display two different links you can use to share this Page. The first link is the public link that you would share with others who are not in the system. This link is a simple and easy method of sharing the Page with others on social media, in email, or anywhere else you can post a link. The second link allows you to embed the Page on your own website using a frame something like this:<iframe height=”600px” src=”https://www.billtrack50.com/public/scorecard/summary/yourlink/embed” width=”100%”></iframe>
- Share this Stakeholder Page With The Mobile App: Checking this box will give you a mobile access code. You can give the registration code to anyone, and they can use it on the Billtrack50 mobile app to see the Stakeholder page. People following your Page on their mobile device can choose to get daily alerts on the status of the bills. For more information on how the mobile pages work see this post.
REMEMBER! You must always click save at the bottom when you are done making changes or your changes will be lost!
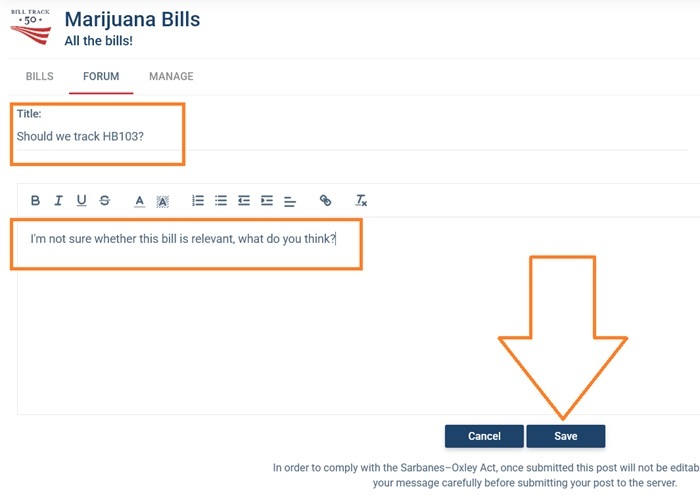
Step 5. Using the Forum (optional). Click on the “Forum” tab at the top to go to the forum page. Here you will see a list of all of the threads your stakeholders have started. To start a new thread you (or they) can click on “New Thread” in the top right corner. To view an existing thread simply click on that thread in the list.
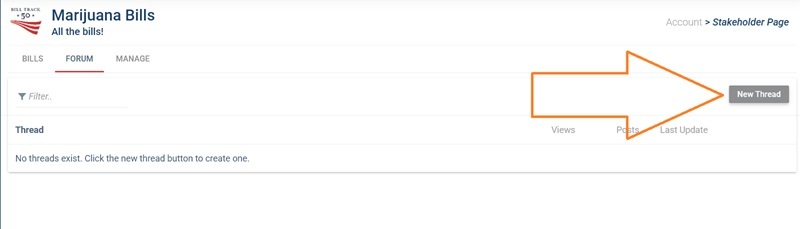
After clicking on “New Thread”, you will be taken to a page that looks like the one below. Put down whatever you want for the title, which will be the text that shows up in the list on the previous page. Finally, the large text box is for you to write a comment, which will appear as the first post in the thread.
Once a thread is established people can add more posts by clicking the “new post” button or by replying to an existing post.
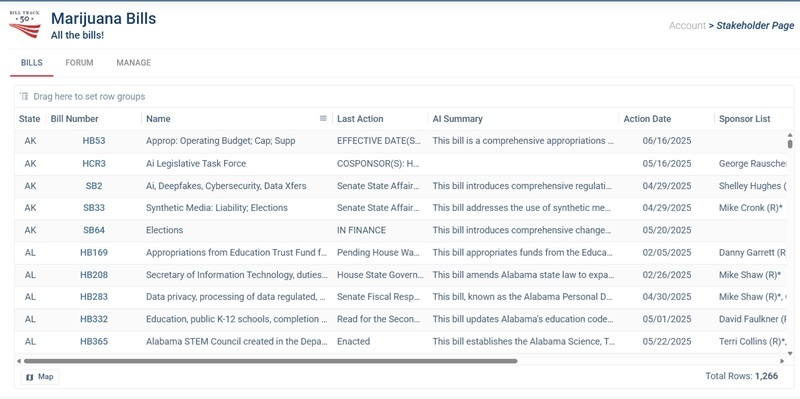
Step 6. The Stakeholder page tab, which displays the Bill Sheet you selected in Step 2. However, there are two key differences. First, you can’t edit this bill sheet, it is display only. Second, it can have a different template, and thus different columns, then the underlying bill sheet. Otherwise it is fully functional and allows for sorting, filtering, grouping, and so on, as well as providing a link to read the bill. Below is an example of what a stakeholder page looks like:
When people click the link that you have sent them, they will see something a little different:
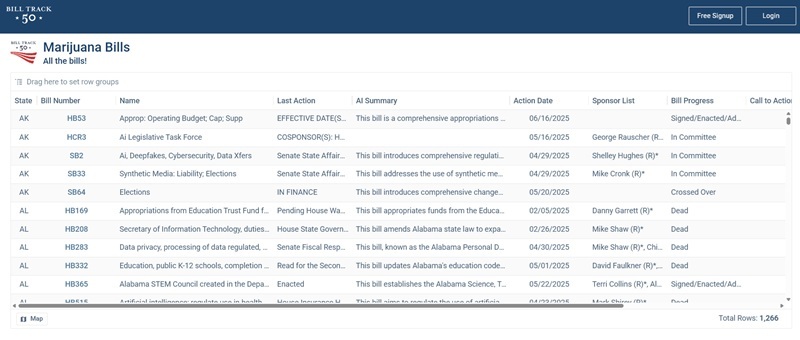
Users don't have to be logged in, or even have a BillTrack50 account, to see the stakeholder page. They will still be able to sort, filter and read the stakeholder page. And they will be able to click the bill number to see the actual bill - again, without having to log in to BillTrack50.
Note: For regulation stakeholder pages, users will need to have at least a free account as our regulation pages aren't openly available on the internet.
Finally, here is an example of a stakeholder page embedded in a website for you to enjoy! https://www.ndchamber.com/business-bill-tracker